Actuators
Outputs
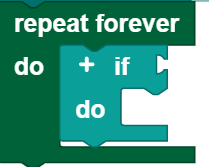
The Start each time block
The Start each time block offers the option of running a program when a condition is fulfilled. Therefore, it works similar to a case distinction, but runs not only one time, but rather every time the condition is fulfilled during the entire course of the program. The Start each time block:
Is an abbreviation for the following construct:

You can insert all conditions from this category into the Outputs category in the Start each time block.
Note: The program section in the Start each time block should be kept short, and should not contain any blocking calls or endless loops, so that this part of the program can be processed quickly.
LEDs
Set
You can use the set LED ... and set LED brightness ... blocks to switch the LEDs on and off, and to set their brightness to a certain value (from 0 to 512).
Call
You can use the get LED brightness block to call up the brightness of an LED and process it as a value.
Query
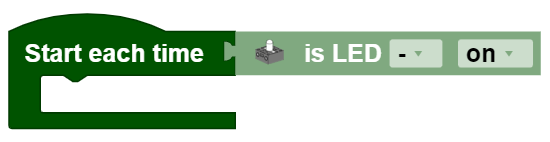
You can use the blocks is LED ... and is LED brightness ... to use the activity or the brightness of an LED as a condition. In the example, the brightness of the LED is set to 512 if it does not already have this brightness.

Motors
The symbol on the motor blocks represents all motors that are not encoder or servo motors.
Set
You can use the set motor speed to []... block to set the speed of a motor to a certain value (from 0 to 512).
Call
You can use the get motor speed block to call up the speed of a motor and process it as a value.
Query
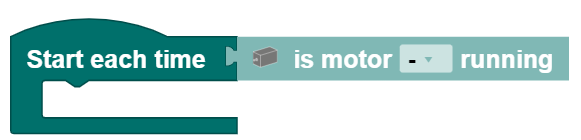
You can use the blocks if motor is running and if motor speed is ... to use the activity or speed of a motor as a condition.
Stop
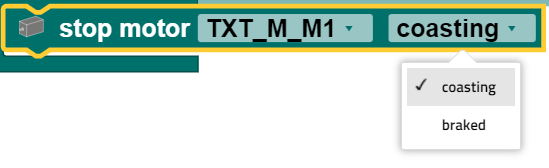
You can use the block stop motor ... to stop a motor.
Compressor

Set
You can use the block set compressor [] to switch the compressor on or off.
Query
You can use the block if compressor [] to use the activity of a compressor as a condition.
Solenoid valve

Set
You can use the block set solenoid valve [] to switch the solenoid valve on or off. Here, “on” means that the valve is open, and “off” means that the valve is closed.
Query
You can use the block if solenoid valve [] to use the activity of a solenoid valve as a condition.
Engine
The Start each time block
The Start each time block offers the option of running a program when a condition is fulfilled. Therefore, it works similar to a case distinction, but runs not only one time, but rather every time the condition is fulfilled during the entire course of the program. The Start each time block:
Is an abbreviation for the following construct:
You can insert all conditions from this category into the motor category in the Start each time block.
Note: The program section in the Start each time block should be kept short, and should not contain any blocking calls or endless loops, so that this part of the program can be processed quickly.
Engine
The symbol on the motor blocks represents all motors that are not encoder or servo motors.
Set
You can use the set motor speed to []... block to set the speed of a motor to a certain value (from 0 to 512). You can use the drop down menu (small triangle) to select the direction of rotation.
Call
You can use the get motor speed block to call up the speed of a motor and process it as a value.
Query
You can use the blocks if motor is running and if motor speed is ... to use the activity or speed of a motor as a condition.
Stop
You can use the block stop motor [] to stop a motor. The stop motor [] block offers the option of stopping a motor directly, or allowing it to run to a stop. You can select the desired option using the drop down menu (small triangle):
Servo motor
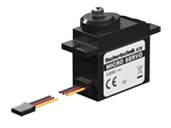
Set
You can use the set position to... block to set the position of a servo motor to a certain value (from 0 to 512). 0 and 512 are the values for the maximum deflection to the left and right. At a value of 256, therefore, the servo motor will be in the center.
Call
You can use the get position block to call up the position of a servo motor and process it as a value.
Encoder motor
The encoder motor has the same functions as a normal motor, but also offers the option of counting revolutions and controlling multiple motors synchronously. A rotation is divided into ~64 steps.
Set
You can use the block

to set the speed of a motor to a certain value (from 0-512). You can use the drop down menu (small triangle) to select the direction of rotation. In addition, you can enter the number of steps the motor should complete. In this example, the motor turns 100 steps, or one and one third turns. As you can see in the example, this block has a plus sign that can be used to control multiple motors synchronously. It is possible to synchronize motors to the master or to an extension, however comprehensive synchronization, for instance between motors of the master and an extension, is not possible.
Note: Multiple synchronization calls in rapid sequence, such as could be caused by a loop (see example), can have a negative impact on synchronicity or prevent this entirely.
Stop
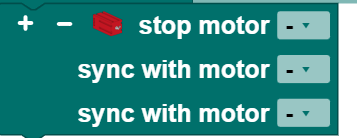
You can use the block stop motor ... to stop a motor. If you would like to stop multiple motors at the same time, you can add up to three additional motors by clicking the plus sign at the left of the block.
Query
Block has reached position is used to utilize reaching the position as a condition. Position here means the end position of an encoder motor after completing the step size.
Sound
The TXT 4.0 Controller: has a built-in speaker, and therefore offers the option of playing sounds.
The Start each time block
The Start each time block offers the option of running a program when a condition is fulfilled. Therefore, it works similar to a case distinction, but runs not only one time, but rather every time the condition is fulfilled during the entire course of the program. The Start each time block:
Is an abbreviation for the following construct:

You can insert all conditions from this category into the sound category in the Start each time block.
Note: The program section in the Start each time block should be kept short, and should not contain any blocking calls or endless loops, so that this part of the program can be processed quickly.
Play
Pre-installed audio files
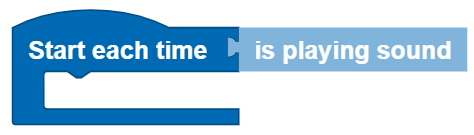
You can use the following block to play one of 29 pre-installed sounds. You can select the desired audio using the drop down menu (small triangle). In addition, the sound can be played in a continuous loop. To do so, check the box beside the continuous loop symbol.
![]()
Own audio files
If you would like to play your own sound, you can use the block
![]()
To embed your own sound in the block, you must:
- be connected to the Controller
- enter the IP address of the Controller in the browser (you must select the IP that was used to connect to the Controller)
- enter USER: ft, PASSWORD: fischertechnik on the accessed page
- open the Sounds folder, and load the desired audio file to the Controller there using the plus sign (important note: the audio file must be available in wav format)
- enter “./filename.wav” in the ROBO Pro Coding block under path
Here as well, you have the option of playing the sound in a continuous loop.
Query
To query whether an audio file is played, use the play sound block. This can be used as a condition in the program.
Stop
To stop a sound, simply use the stop playing sound block in the program.
Display
You can use the blocks in the Display category to design the screen of the TXT 4.0 Controller and make it easier to use. This requires two steps:
- Configure, which means
- open a new file in the Display category using the Pages symbol with the plus sign at the top left
- drag the desired items to the screened area (this represents the configurable part of the display)
- adjust the specifications as needed.
- Program, which means
- program the interactions with the display in the main program using the blocks in the Display category.
Blocks
Event request
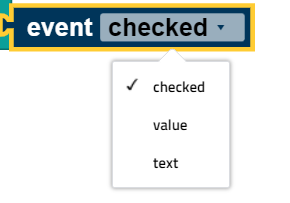
The event block [] opens the return value for an element. This block can only be used in the event programs. In these event programs, the block automatically relates to the event in whose program it is used. You can select the suitable type for the return value using the drop down menu (small triangle):
Label field
You can use the label field element to place a text on the screen. The symbol in the display configurator is the label. Drag this symbol to the screened area to open a window at the right side. Here, you can use Inspector to define
- the size of the label field in pixels,
- the position of the label field in pixels (the top left corner of the text field is at the given point),
- the name of the label field, and
- the content of the label field (this text is shown when the Display is started).
You can use the block set label field text ... to change the text shown in the course of the program.
Submissions
The inputs element allows users to enter text via the Controller. The associated symbol in the display configurator is the “T” character. Drag this symbol to the screened area to open a window at the right side. Here, you can use Inspector to define
- the size of the input field in pixels,
- the position of the input field in pixels (the top left corner of the input field is at the given point),
- the name of the input field, and
- the content of the input field (this text is shown when the Display is started)
You can use the block set input field text ... to change the text shown in the course of the program.
Input program
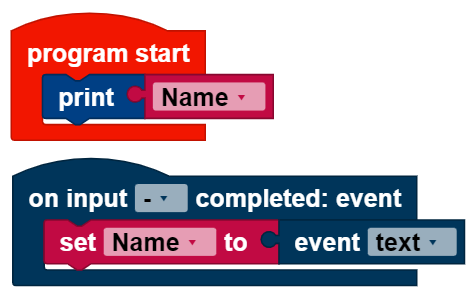
The input program runs when an input is complete. It is written separately from the main program. Variables work globally across both programs. The input program runs in the block when input is complete. The event [] block is set to “text” in the input program. In this example, the variable name is set to the entered text; it is then used in the main program to output the entered text :
Measurement instrument
The measurement instrument function can display values (no values below 1). The associated symbol in the display configurator is the scale. Drag this symbol to the screened area to open a window at the right side. Here, you can use Inspector to define
- the size of the measurement instrument in pixels,
- the position of the measurement instrument in pixels (the top left corner of the measurement gage is at the given point),
- the name of the measurement instrument,
- the alignment of the measurement instrument,
- the value range which the measurement instrument shows, and
- the value of the measurement instrument shown when you start the display
You can use the block set measurement instrument to value ... to set the measurement instrument to the entered value. This value should be within the pre-defined value range. If the value is outside of the value range, then one of the limits of the value range is shown depending on whether the value is too high or too low.
Status indicator
The status indicator displays the activity of something. Depending on the status, it will be illuminated (“active”) or not (“inactive”). The symbol in the display configurator is an illuminated diode. Drag this symbol to the screened area to open a window at the right side. Here, you can use Inspector to define
- the size of the status indicator in pixels,
- the position of the status indicator in pixels (the top left corner of the status indicator is at the given point),
- the name of the status indicator,
- the color of the status indicator, and
- whether the status indicator should initially be active or inactive,
Use the block set status indicator active [] to activate or deactivate the status indicator. You can choose whether the status indicator should be set to active or inactive using the drop down menu (small triangle).
Slider
The slider indicates values based on its position. The user can change the position using the touch screen. The value can be accessed using the event [] block once the slider stops. The accessed value is a decimal number. If you want a whole number for the slider value, you must use the round block. The associated symbol for the slider is a line with a circle. Drag this symbol to the screened area to open a window at the right side. Here, you can use Inspector to define
- the size of the slider in pixels,
- the position of the slider in pixels (the top left corner of the slider is at the given point)
- the name of the slider,
- the activity of the slider,
- the alignment of the slider,
- the value range covered by the slider, and
- the value at which the slider will be set when the display is started
You can use the block set slider value ... to move the slider to another value.
You can use set slider activated [] to change the activity using the drop down menu (small triangle).
Slider program
The slider program starts after the slider has been moved. It is written separately from the main program. Variables work globally across both programs. The slider program runs in the block on slider moved. The event [] block is set to “value” in the slider program. In this example, the speed of the motor is controlled using the slider. The value of the slider must be rounded, since the motor only accepts whole numbers for the speed:

Button
The button is a labeled field that can be pressed. If you press the button, the button program will run once you release it again. The associated symbol for the button is the square labeled “OK.” Drag this symbol to the screened area to open a window at the right side. Here, you can use Inspector to define
- the size of the button in pixels,
- the position of the button in pixels (the top left corner of the button is at the given point),
- the name of the button,
- the text shown on the button, and
- the activity of the button.
You can use block set button activated [] to change the activity using the drop down menu (small triangle).
Button program
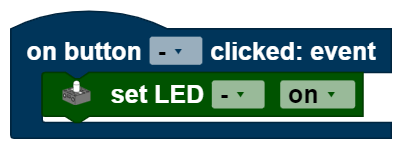
The button program runs when the button is released. It is written separately from the main program. Variables work globally across both programs. The button program runs in the block on button clicked. The event [] block cannot be used in the button program, since the button has no return value. In this example, the LED is activated when the button is pressed.
Switch
The switch can be in one of two positions, and is always in exactly one of these two positions. It returns true or false , depending on its position. The associated symbol for the switch is the oval with the dot. Drag this symbol to the screened area to open a window at the right side. Here, you can use Inspector to define
- the size of the switch in pixels,
- the position of the switch in pixels (the top left corner of the switch is at the given point),
- the name of the switch,
- the text shown beside the switch,
- the activity of the switch, and
- the status the switch should be in when the program is started
The block

takes over two functions. You can set the activity (select enabled in the drop down menu) or the status (select checked in the drop down menu) to either true or false.
Switch program
The switch program runs each time the switch is moved from one setting to another. It is written separately from the main program. Variables work globally across both programs. The switch program runs in the block on switch toggled. The event [] block is set to “checked” in the switch program, it returns the values true or false . This example program turns the LED on when the switch is toggled; otherwise, the LED is turned off:

Checkbox
The checkbox can have one of two statuses, and is always in exactly one of these two statuses. It returns true or false , depending on the status. The symbol for the checkbox is the square with the check mark. Drag this symbol to the screened area to open a window at the right side. Here, you can use Inspector to define
- the size of the checkbox in pixels,
- the position of the checkbox in pixels (the top left corner of the checkbox is at the given point),
- the name of the checkbox,
- the text shown beside the checkbox,
- the activity of the checkbox, and
- the status the checkbox should be in when the program is started.
The following block takes over two functions. You can use the drop down menu (small triangle) to select which of these you will use. You can set the activity (select enabled in the drop down menu) or the status (select checked in the drop down menu) to either true or false .

Checkbox program
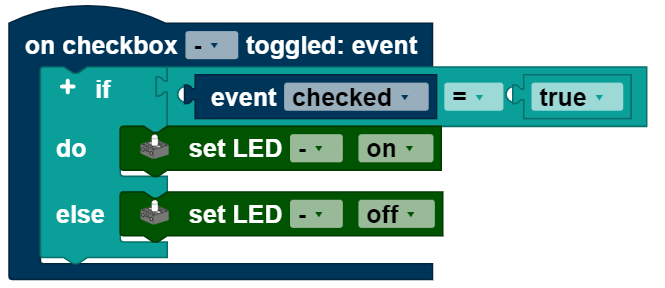
The checkbox program runs each time the checkbox is pressed. It is written separately from the main program. Variables work across both programs. The checkbox program runs in the block on checkbox toggled. The event [] block is set to “checked” in the switch program, it returns the values true or false . This example program turns the LED on when the checkbox is checked; otherwise, the LED is turned off.