ROBO Pro Coding (EN)
General use
General use
ROBO Pro Coding is a development environment used to program the new TXT 4.0 Controller, and for programming fischertechnik models. ROBO Pro Coding is available for Windows, macOS, Linux, iOS, and Android, and can be obtained from these sources.


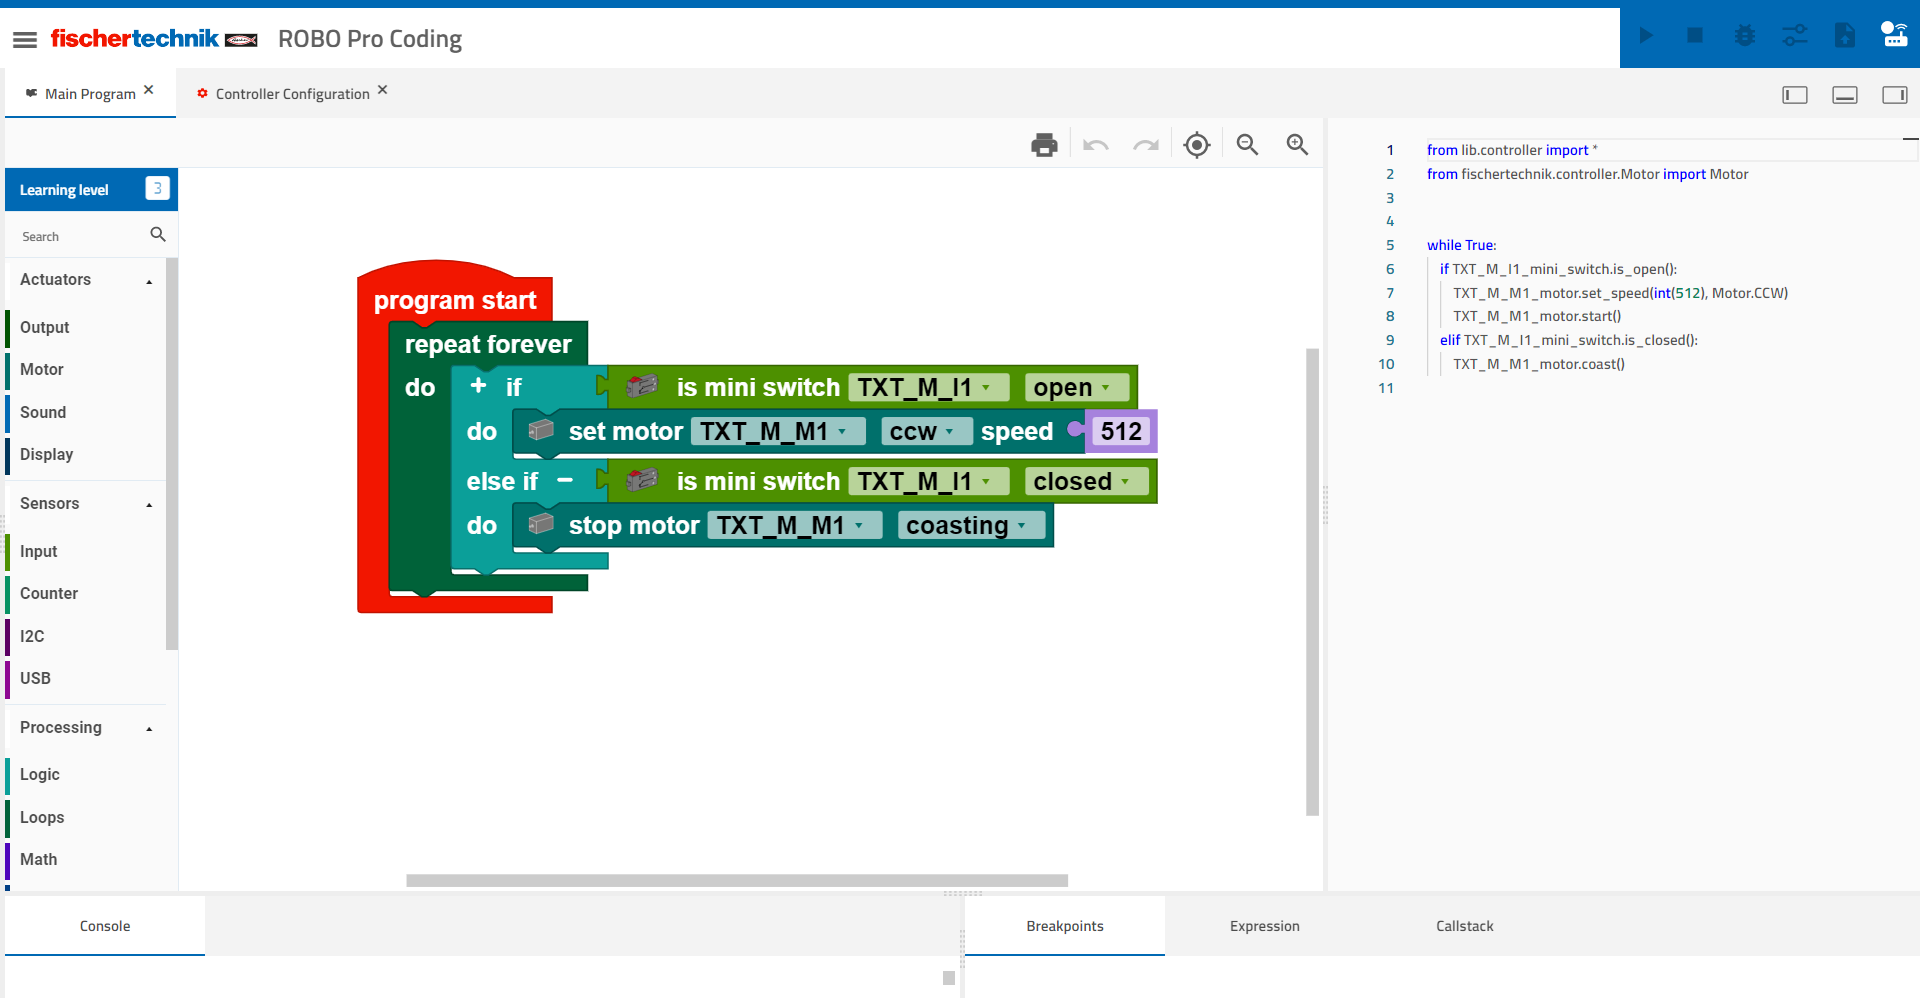

The code shown could be used for this model (left).The web interface of ROBO Pro Coding is structured as follows (the numbers refer to the areas designated in the image):
- This section shows what was programmed in blocks in Python
- This is the field to which the blocks are dragged to program them
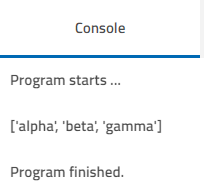
- The program process is documented in the console
- Breakpoints are used to debug programs. They define certain points in the code at which the program is stopped. These are set using the Editor, and consist of the file name + line number.
- You can view variable content under Expression.
- The Callstack shows the nesting of calls. This is helpful in particular when using functions.
- This section includes all blocks for programming, sorted into the categories of actuators, sensors and processing
- This line is explained separately under header
- You can adjust the learning level to the user here. Depending on the level, for instance, only the most important blocks are displayed.
Header

The header contains (from left to right) the operating elements for starting the program, stopping the program, starting the debugger, accessing the interface test, uploading the current program, and connecting to the Controller.
Starting programs
To start your program from ROBO Pro Coding, click this symbol.
Stopping programs
To stop your program before it ends independently, touch this symbol.
The debugger
The debugger is designed to make it easier to find errors in a program. You can use the menu at the top right corner to go through the code step by step, thereby simulating a program run. The program will nevertheless react to interactions with sensors, such as pushing a button. While running through the program, you can see which block you are in at the left side in the large field, as well as what point in the Python code you are at on the right side.
The interface test
When you click this symbol with the three sliders, this window will open:
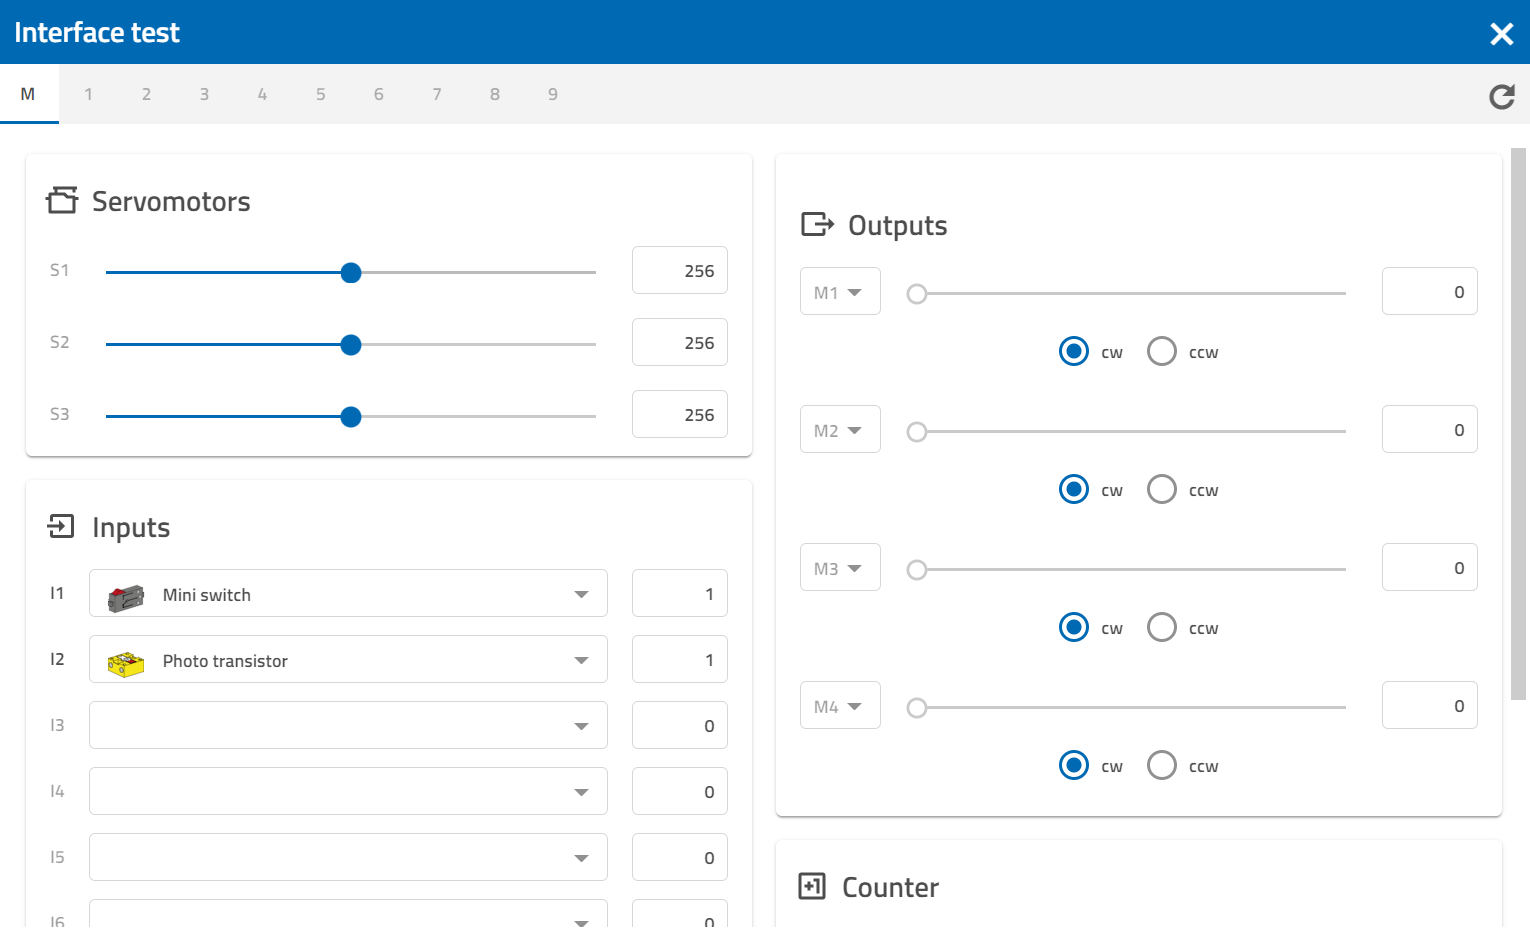
You can view all connected devices here. Under actuators, you can use the sliders to check whether they are working. The measured values are indicated for the sensors (there is a 1 by the button, for instance, because it is pressed). You can use the drop down menu (small triangle) to indicate what is connected.
Uploading programs
If you have written a program and want it to run autonomously on the Controller, you can load it to the Controller using this symbol. It will then appear as one of the files on the Controller. Touch the program name there to access the sub-folder for the program. There is a file here named “main.py.” Click this file, and the “Open” button at the bottom right should be illuminated green. If you press the “Open” button, another menu will open with four options:
- Load: Load the program, then you can start it from the home screen
- Auto load: The program will be re-loaded automatically the next time you start the Controller
- Auto start: The program will be re-loaded automatically the next time you start the Controller and started directly
- Delete project: The program will be deleted from the Controller
Connecting to the Controller
This section explains how to connect to the Controller.
Controller configuration
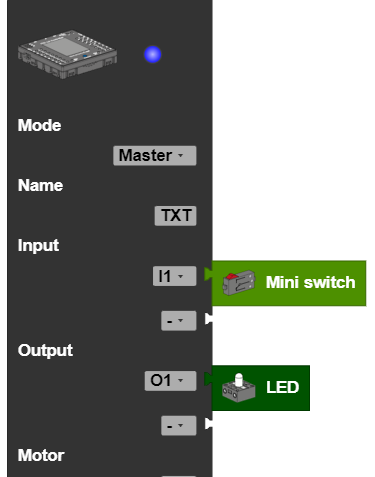
To use components such as sensors and actuators in the program, you must connect them to the Controller, not only physically, but in the software as well. The Controller configuration is always opened automatically, and can be accessed at the top directly beside the main program.
Now, the Controller and all available components that can be connected to the Controller are displayed in the left area. Drag the Controller to the programming area. Then, you can connect the desired components to the Controller via drag and drop.
Saving programs
If you would like to save a program, click the three lines at the top left of the ROBO Pro Coding website. Touch the “Export” option here. Now, you can select whether you would like to save your program locally on your device or on GitLab.
Local: After you have entered the name of the program, simply click “Export” and the program file will be on your device.
GitLab: After you have entered the name of your program and followed the steps indicated to enter your personal access token, simply click “Export” and the program file will be saved in your GitLab account.
Actuators
Outputs
The Start each time block
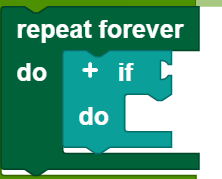
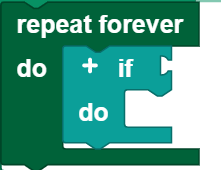
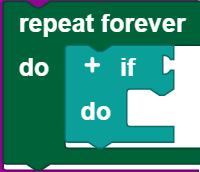
The Start each time block offers the option of running a program when a condition is fulfilled. Therefore, it works similar to a case distinction, but runs not only one time, but rather every time the condition is fulfilled during the entire course of the program. The Start each time block:
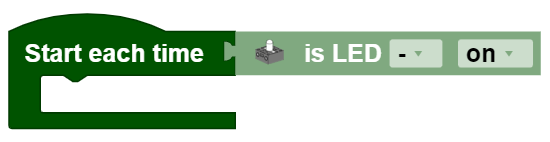
Is an abbreviation for the following construct:

You can insert all conditions from this category into the Outputs category in the Start each time block.
Note: The program section in the Start each time block should be kept short, and should not contain any blocking calls or endless loops, so that this part of the program can be processed quickly.
LEDs
Set
You can use the set LED ... and set LED brightness ... blocks to switch the LEDs on and off, and to set their brightness to a certain value (from 0 to 512).
Call
You can use the get LED brightness block to call up the brightness of an LED and process it as a value.
Query
You can use the blocks is LED ... and is LED brightness ... to use the activity or the brightness of an LED as a condition. In the example, the brightness of the LED is set to 512 if it does not already have this brightness.

Motors
The symbol on the motor blocks represents all motors that are not encoder or servo motors.
Set
You can use the set motor speed to []... block to set the speed of a motor to a certain value (from 0 to 512).
Call
You can use the get motor speed block to call up the speed of a motor and process it as a value.
Query
You can use the blocks if motor is running and if motor speed is ... to use the activity or speed of a motor as a condition.
Stop
You can use the block stop motor ... to stop a motor.
Compressor

Set
You can use the block set compressor [] to switch the compressor on or off.
Query
You can use the block if compressor [] to use the activity of a compressor as a condition.
Solenoid valve

Set
You can use the block set solenoid valve [] to switch the solenoid valve on or off. Here, “on” means that the valve is open, and “off” means that the valve is closed.
Query
You can use the block if solenoid valve [] to use the activity of a solenoid valve as a condition.
Engine
The Start each time block
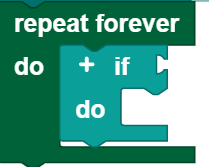
The Start each time block offers the option of running a program when a condition is fulfilled. Therefore, it works similar to a case distinction, but runs not only one time, but rather every time the condition is fulfilled during the entire course of the program. The Start each time block:
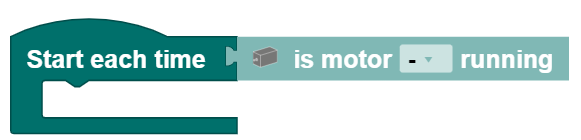
Is an abbreviation for the following construct:
You can insert all conditions from this category into the motor category in the Start each time block.
Note: The program section in the Start each time block should be kept short, and should not contain any blocking calls or endless loops, so that this part of the program can be processed quickly.
Engine
The symbol on the motor blocks represents all motors that are not encoder or servo motors.
Set
You can use the set motor speed to []... block to set the speed of a motor to a certain value (from 0 to 512). You can use the drop down menu (small triangle) to select the direction of rotation.
Call
You can use the get motor speed block to call up the speed of a motor and process it as a value.
Query
You can use the blocks if motor is running and if motor speed is ... to use the activity or speed of a motor as a condition.
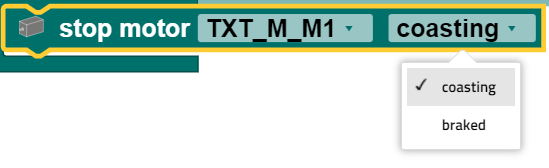
Stop
You can use the block stop motor [] to stop a motor. The stop motor [] block offers the option of stopping a motor directly, or allowing it to run to a stop. You can select the desired option using the drop down menu (small triangle):
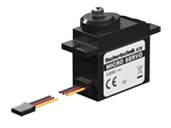
Servo motor
Set
You can use the set position to... block to set the position of a servo motor to a certain value (from 0 to 512). 0 and 512 are the values for the maximum deflection to the left and right. At a value of 256, therefore, the servo motor will be in the center.
Call
You can use the get position block to call up the position of a servo motor and process it as a value.
Encoder motor
The encoder motor has the same functions as a normal motor, but also offers the option of counting revolutions and controlling multiple motors synchronously. A rotation is divided into ~64 steps.
Set
You can use the block

to set the speed of a motor to a certain value (from 0-512). You can use the drop down menu (small triangle) to select the direction of rotation. In addition, you can enter the number of steps the motor should complete. In this example, the motor turns 100 steps, or one and one third turns. As you can see in the example, this block has a plus sign that can be used to control multiple motors synchronously. It is possible to synchronize motors to the master or to an extension, however comprehensive synchronization, for instance between motors of the master and an extension, is not possible.
Note: Multiple synchronization calls in rapid sequence, such as could be caused by a loop (see example), can have a negative impact on synchronicity or prevent this entirely.
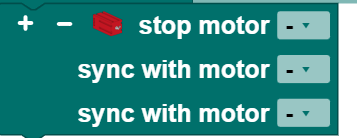
Stop
You can use the block stop motor ... to stop a motor. If you would like to stop multiple motors at the same time, you can add up to three additional motors by clicking the plus sign at the left of the block.
Query
Block has reached position is used to utilize reaching the position as a condition. Position here means the end position of an encoder motor after completing the step size.
Sound
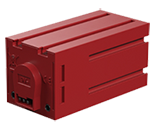
The TXT 4.0 Controller: has a built-in speaker, and therefore offers the option of playing sounds.
The Start each time block
The Start each time block offers the option of running a program when a condition is fulfilled. Therefore, it works similar to a case distinction, but runs not only one time, but rather every time the condition is fulfilled during the entire course of the program. The Start each time block:
Is an abbreviation for the following construct:

You can insert all conditions from this category into the sound category in the Start each time block.
Note: The program section in the Start each time block should be kept short, and should not contain any blocking calls or endless loops, so that this part of the program can be processed quickly.
Play
Pre-installed audio files
You can use the following block to play one of 29 pre-installed sounds. You can select the desired audio using the drop down menu (small triangle). In addition, the sound can be played in a continuous loop. To do so, check the box beside the continuous loop symbol.
![]()
Own audio files
If you would like to play your own sound, you can use the block
![]()
To embed your own sound in the block, you must:
- be connected to the Controller
- enter the IP address of the Controller in the browser (you must select the IP that was used to connect to the Controller)
- enter USER: ft, PASSWORD: fischertechnik on the accessed page
- open the Sounds folder, and load the desired audio file to the Controller there using the plus sign (important note: the audio file must be available in wav format)
- enter “./filename.wav” in the ROBO Pro Coding block under path
Here as well, you have the option of playing the sound in a continuous loop.
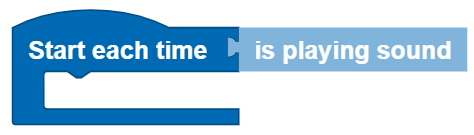
Query
To query whether an audio file is played, use the play sound block. This can be used as a condition in the program.
Stop
To stop a sound, simply use the stop playing sound block in the program.
Display
You can use the blocks in the Display category to design the screen of the TXT 4.0 Controller and make it easier to use. This requires two steps:
- Configure, which means
- open a new file in the Display category using the Pages symbol with the plus sign at the top left
- drag the desired items to the screened area (this represents the configurable part of the display)
- adjust the specifications as needed.
- Program, which means
- program the interactions with the display in the main program using the blocks in the Display category.
Blocks
Event request
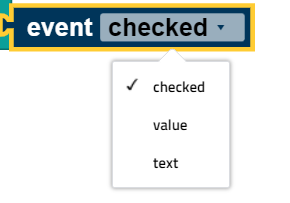
The event block [] opens the return value for an element. This block can only be used in the event programs. In these event programs, the block automatically relates to the event in whose program it is used. You can select the suitable type for the return value using the drop down menu (small triangle):
Label field
You can use the label field element to place a text on the screen. The symbol in the display configurator is the label. Drag this symbol to the screened area to open a window at the right side. Here, you can use Inspector to define
- the size of the label field in pixels,
- the position of the label field in pixels (the top left corner of the text field is at the given point),
- the name of the label field, and
- the content of the label field (this text is shown when the Display is started).
You can use the block set label field text ... to change the text shown in the course of the program.
Submissions
The inputs element allows users to enter text via the Controller. The associated symbol in the display configurator is the “T” character. Drag this symbol to the screened area to open a window at the right side. Here, you can use Inspector to define
- the size of the input field in pixels,
- the position of the input field in pixels (the top left corner of the input field is at the given point),
- the name of the input field, and
- the content of the input field (this text is shown when the Display is started)
You can use the block set input field text ... to change the text shown in the course of the program.
Input program
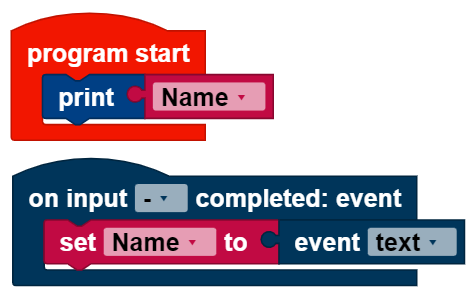
The input program runs when an input is complete. It is written separately from the main program. Variables work globally across both programs. The input program runs in the block when input is complete. The event [] block is set to “text” in the input program. In this example, the variable name is set to the entered text; it is then used in the main program to output the entered text :
Measurement instrument
The measurement instrument function can display values (no values below 1). The associated symbol in the display configurator is the scale. Drag this symbol to the screened area to open a window at the right side. Here, you can use Inspector to define
- the size of the measurement instrument in pixels,
- the position of the measurement instrument in pixels (the top left corner of the measurement gage is at the given point),
- the name of the measurement instrument,
- the alignment of the measurement instrument,
- the value range which the measurement instrument shows, and
- the value of the measurement instrument shown when you start the display
You can use the block set measurement instrument to value ... to set the measurement instrument to the entered value. This value should be within the pre-defined value range. If the value is outside of the value range, then one of the limits of the value range is shown depending on whether the value is too high or too low.
Status indicator
The status indicator displays the activity of something. Depending on the status, it will be illuminated (“active”) or not (“inactive”). The symbol in the display configurator is an illuminated diode. Drag this symbol to the screened area to open a window at the right side. Here, you can use Inspector to define
- the size of the status indicator in pixels,
- the position of the status indicator in pixels (the top left corner of the status indicator is at the given point),
- the name of the status indicator,
- the color of the status indicator, and
- whether the status indicator should initially be active or inactive,
Use the block set status indicator active [] to activate or deactivate the status indicator. You can choose whether the status indicator should be set to active or inactive using the drop down menu (small triangle).
Slider
The slider indicates values based on its position. The user can change the position using the touch screen. The value can be accessed using the event [] block once the slider stops. The accessed value is a decimal number. If you want a whole number for the slider value, you must use the round block. The associated symbol for the slider is a line with a circle. Drag this symbol to the screened area to open a window at the right side. Here, you can use Inspector to define
- the size of the slider in pixels,
- the position of the slider in pixels (the top left corner of the slider is at the given point)
- the name of the slider,
- the activity of the slider,
- the alignment of the slider,
- the value range covered by the slider, and
- the value at which the slider will be set when the display is started
You can use the block set slider value ... to move the slider to another value.
You can use set slider activated [] to change the activity using the drop down menu (small triangle).
Slider program
The slider program starts after the slider has been moved. It is written separately from the main program. Variables work globally across both programs. The slider program runs in the block on slider moved. The event [] block is set to “value” in the slider program. In this example, the speed of the motor is controlled using the slider. The value of the slider must be rounded, since the motor only accepts whole numbers for the speed:

Button
The button is a labeled field that can be pressed. If you press the button, the button program will run once you release it again. The associated symbol for the button is the square labeled “OK.” Drag this symbol to the screened area to open a window at the right side. Here, you can use Inspector to define
- the size of the button in pixels,
- the position of the button in pixels (the top left corner of the button is at the given point),
- the name of the button,
- the text shown on the button, and
- the activity of the button.
You can use block set button activated [] to change the activity using the drop down menu (small triangle).
Button program
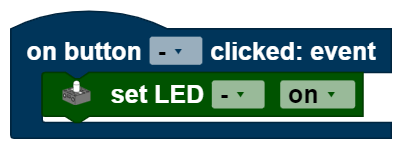
The button program runs when the button is released. It is written separately from the main program. Variables work globally across both programs. The button program runs in the block on button clicked. The event [] block cannot be used in the button program, since the button has no return value. In this example, the LED is activated when the button is pressed.
Switch
The switch can be in one of two positions, and is always in exactly one of these two positions. It returns true or false , depending on its position. The associated symbol for the switch is the oval with the dot. Drag this symbol to the screened area to open a window at the right side. Here, you can use Inspector to define
- the size of the switch in pixels,
- the position of the switch in pixels (the top left corner of the switch is at the given point),
- the name of the switch,
- the text shown beside the switch,
- the activity of the switch, and
- the status the switch should be in when the program is started
The block

takes over two functions. You can set the activity (select enabled in the drop down menu) or the status (select checked in the drop down menu) to either true or false.
Switch program
The switch program runs each time the switch is moved from one setting to another. It is written separately from the main program. Variables work globally across both programs. The switch program runs in the block on switch toggled. The event [] block is set to “checked” in the switch program, it returns the values true or false . This example program turns the LED on when the switch is toggled; otherwise, the LED is turned off:

Checkbox
The checkbox can have one of two statuses, and is always in exactly one of these two statuses. It returns true or false , depending on the status. The symbol for the checkbox is the square with the check mark. Drag this symbol to the screened area to open a window at the right side. Here, you can use Inspector to define
- the size of the checkbox in pixels,
- the position of the checkbox in pixels (the top left corner of the checkbox is at the given point),
- the name of the checkbox,
- the text shown beside the checkbox,
- the activity of the checkbox, and
- the status the checkbox should be in when the program is started.
The following block takes over two functions. You can use the drop down menu (small triangle) to select which of these you will use. You can set the activity (select enabled in the drop down menu) or the status (select checked in the drop down menu) to either true or false .

Checkbox program
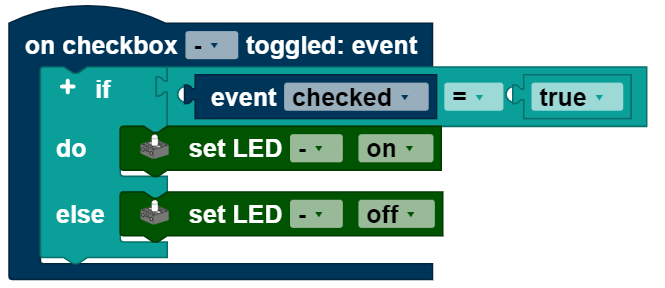
The checkbox program runs each time the checkbox is pressed. It is written separately from the main program. Variables work across both programs. The checkbox program runs in the block on checkbox toggled. The event [] block is set to “checked” in the switch program, it returns the values true or false . This example program turns the LED on when the checkbox is checked; otherwise, the LED is turned off.
Sensors
Input
The Start each time block
The Start each time block offers the option of running a program when a condition is fulfilled. Therefore, it works similar to a case distinction, but runs not only one time, but rather every time the condition is fulfilled during the entire course of the program. The Start each time block:

Is an abbreviation for the following construct:
You can insert all conditions from this category into the inputs category in the Start each time block.
Note: The program section in the Start each time block should be kept short, and should not contain any blocking calls or endless loops, so that this part of the program can be processed quickly.
Button
The button is a digital sensor that differentiates “current flowing” from “no current flowing.” Whether current is flowing, therefore, depends both on the wiring and on whether the button is pushed. You can use the button in two ways:

As a “normally open contact”:
contacts 1 and 3 are connected.
Button pressed: Current is flowing. Button not pressed: No current is flowing
Contacts 1 and 2 are connected.
Call
You can use get mini button status to obtain more information on whether current is flowing through the button or not. If current is flowing, it will return 1, or 0 if no current is flowing.
Query
To query whether the button is in a certain status, use the is button ... block. You can use the drop down menu (small triangle) to select which status to query. This block can be used as a condition.
Ultrasonic sensor
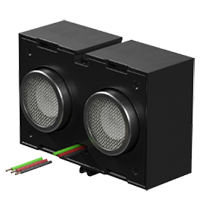
The ultrasonic sensor is used to measure distances.
Call
You can use get ultrasonic sensor distance to obtain information on how far the sensor is from the closest object. The distance is stated in cm.
Query
To query whether the sensor is a certain distance from the closest object, use the is ultrasonic sensor distance ... block. You can use the drop down menu (small triangle) to select how the measured distance should be compared to an entered value (<, ≤, =, ≠, ≥, >) . The comparison value is entered in the number field at the end of the block. This block can be used as a condition. In the example, the motor is stopped when the measured distance is less than 2 cm.

Color sensor
The color sensor transmits red light, and measures how much of the light is reflected back. The color sensor returns values between 0 and 2000 depending on how strong the reflection is. It is well-suited for detecting previously calibrated colors.
Call
You can use get color sensor value to obtain information on how strongly a surface reflects the light.
Query
To query whether the sensor is in front of a certain color, use the is color sensor value ... block. You can use the drop down menu (small triangle) to select how the measured color value should be compared to the entered value (<, ≤, =, ≠, ≥, >) . The comparison value is entered in the number field at the end of the block. This block can be used as a condition. In the example, the motor is stopped when the measured color value is less than 1000.

IR track sensor

The infrared track sensor is a digital sensor used for detecting a black track on a white background, and works at a distance of 5 - 30 mm between the sensor and the background.
Call
Get IR track sensor status will return 0 if the sensor does not detect a track. If the sensor detects a track, it will return 1
Query
To query whether the IR track sensor detects a track, compare the current track status with 0 or 1. To do so, use the block is IR track sensor status [] ... . You can use the drop down menu (small triangle) to select how the track status should be compared to the entered value (<, ≤, =, ≠, ≥, >) . The comparison value is entered in the number field at the end of the block. This block can be used as a condition. In the example, the motor is stopped when the track status is 0

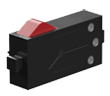
Phototransistor

The phototransistor is a digital sensor that differentiates between light and dark.
Call
Get phototransistor status will return 0 if the sensor does not detect any light. If the sensor detects sufficient light, it will return 1.
Query
To query whether the phototransistor detects light or dark, compare the brightness status with 0 or 1. To do so, use the block is phototransistor status []. You can use the drop down menu (small triangle) to select whether to query light or dark.
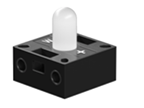
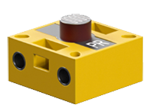
 One possible use for a phototransistor is in a light barrier, as in this model.
Photoresistor
the resistance of the photoresistor drops when it is exposed to more brightness. The value output by the photoresistor, therefore, is a measurement of brightness.
Call
Get photoresistor value provides information on how bright it is. The smaller the output value, the brighter it is.
Query
To query whether the photoresistor measures a certain brightness value, use the block is photoresistor value [] ... You can use the drop down menu (small triangle) to select how the brightness value should be compared to the entered value (<, ≤, =, ≠, ≥, >). The comparison value is entered in the number field at the end of the block. This block can be used as a condition. In the example, the motor is stopped when the brightness value is less than 3000.

NTC resistor

The NTC resistor is a non-binary temperature sensor. Its electrical resistance drops when the temperature increases, and is therefore a measurement for the temperature.
Call
Get NTC resistance [] delivers either a resistance value or the temperature calculated from it. You can select what should be delivered using the drop down menu (small triangle).
Query
To query whether the NTC resistor measures a certain value, use the block is NTC resistance [] [] ... You can use the drop down menu (small triangle) to select what should be compared, and with what comparative operator. The comparison value is entered in the number field at the end of the block. This block can be used as a condition. In the example, the motor is stopped when the temperature is less than 20.

Counter

The encoder motor can be used as a counter. The number of revolutions is counted, not only when it is turning itself as a motor, but also when it is mechanically driven by an external force.
The Start each time block
The Start each time block offers the option of running a program when a condition is fulfilled. Therefore, it works similar to a case distinction, but runs not only one time, but rather every time the condition is fulfilled during the entire course of the program. The Start each time block:

Is an abbreviation for the following construct:
You can insert all conditions from this category into the counter category in the Start each time block.
Note: The program section in the Start each time block should be kept short, and should not contain any blocking calls or endless loops, so that this part of the program can be processed quickly.
Call
Use Get counter value to obtain the value counted by the counter.
Query
To query whether the counter has counted a certain value, use this
![]()
the drill hole. You can use the drop down menu (small triangle) to select how the counted value should be compared to the entered value (<, ≤, =, ≠, ≥, >) .
Reset
The counter starts over at 0 when the Reset counter block is executed.
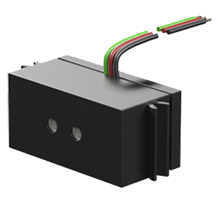
I2C
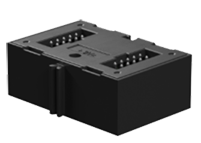
The I2C sensors described in this section are connected to the TXT 4.0 Controller using a suitable ribbon cable.
The Start each time block
The Start each time block offers the option of running a program when a condition is fulfilled. Therefore, it works similar to a case distinction, but runs not only one time, but rather every time the condition is fulfilled during the entire course of the program. The Start each time block:

Is an abbreviation for the following construct:

You can insert all conditions from this category into the I2C category in the Start each time block.
Note: The program section in the Start each time block should be kept short, and should not contain any blocking calls or endless loops, so that this part of the program can be processed quickly.
Combi sensor
The combi sensor combines the three functions of an acceleration sensor, gyroscope, and compass sensor in one component.
Acceleration sensor
Call
Use get combi sensor acceleration in [] to obtain the acceleration in one spatial direction. You can select the desired spatial direction using the drop down menu (small triangle). The acceleration is indicated in g.
Query
Use the combi sensor acceleration in [] [] ... block to query whether you are measuring a certain acceleration. You can use the drop down menu (small triangle) to select how the acceleration should be compared to the entered value (<, ≤, =, ≠, ≥, >) and what spatial direction should be queried. The comparison value is entered in the number field at the end of the block. This block can be used as a condition. In the example, the motor is stopped when the acceleration in the x direction is greater than 10.

Gyroscope
Call
Use get combi sensor rotation in [] to obtain the rotation in one spatial direction. You can select the desired spatial direction using the drop down menu (small triangle). The rotation is indicated in °/s.
Query
Use the combi sensor rotation in [] [] ... block to query whether you are measuring a certain angular speed. You can use the drop down menu (small triangle) to select how the rotation should be compared to the entered value (<, ≤, =, ≠, ≥, >) and what spatial direction should be queried. The comparison value is entered in the number field at the end of the block. This block can be used as a condition. In the example, the motor is stopped when the rotation in the x direction is greater than 10.

Compass sensor
Call
Use get combi sensor magnetic flux in [] to obtain the magnetic flux in one spatial direction. You can select the desired spatial direction using the drop down menu (small triangle). The magnetic flux is indicated in μT.
Query
Use the combi sensor magnetic flux in [] [] ... block to query whether you are measuring a certain magnetic flux. You can use the drop down menu (small triangle) to select how the magnetic flux should be compared to the entered value (<, ≤, =, ≠, ≥, >) and what spatial direction should be queried. The comparison value is entered in the number field at the end of the block. This block can be used as a condition. In the example, the motor is stopped when the magnetic flux in the x direction is greater than 10.

Environmental sensor

The environmental sensor combines the four functions of an air quality sensor, humidity sensor, barometer, and thermometer in one component.
Air quality sensor
Call
You can use the get environmental sensor air quality as [] block to measure the air quality. You can use the drop down menu (small triangle) to select whether the air quality should be returned as a numerical value (from 0 to 500) or as a text.
Query
Use the environmental sensor air quality [] ... block to query whether you are measuring a certain air quality. You can use the drop down menu (small triangle) to select how the air quality should be compared to the entered value (<, ≤, =, ≠, ≥, >) . The comparison value is entered in the number field at the end of the block. This block can be used as a condition. In the example, the motor is stopped when the air quality is greater than 10.

Barometer
Call
You can use the get environmental sensor air pressure block to measure the air pressure.
Query
Use the environmental sensor air pressure [] ... block to query whether you are measuring a certain air pressure. You can use the drop down menu (small triangle) to select how the air pressure should be compared to the entered value (<, ≤, =, ≠, ≥, >) . The comparison value is entered in the number field at the end of the block. This block can be used as a condition. In the example, the motor is stopped when the air pressure is greater than 10.

Thermometer
Call
You can use the get environmental sensor temperature block to measure the temperature.
Query
Use the environmental sensor temperature [] ... block to query whether you are measuring a certain temperature. You can use the drop down menu (small triangle) to select how the temperature should be compared to the entered value (<, ≤, =, ≠, ≥, >) . The comparison value is entered in the number field at the end of the block. This block can be used as a condition. In the example, the motor is stopped when the temperature is greater than 10.

Humidity sensor
Call
You can use the get environmental sensor humidity block to measure the humidity.
Query
Use the environmental sensor humidity [] ... [] ... block to query whether you are measuring a certain humidity. You can use the drop down menu (small triangle) to select how the humidity should be compared to the entered value (<, ≤, =, ≠, ≥, >) . The comparison value is entered in the number field at the end of the block. This block can be used as a condition. In the example, the motor is stopped when the humidity is greater than 10.

USB
You can use the USB port to connect the camera with integrated microphone. The camera and microphone are considered separately here. To use the camera functions, you must first configure them in the camera configurator. This section explains how to access the camera configurator.
Camera

The camera can be used, in particular, as a motion detector, a color detector, a ball detector, and a line detector.
Motion detector
To use the camera as a motion detector, you must drag the little man symbol into the screened area in the camera configurator; then, a window will open at the right side where you can define, under inspector
- the pixel area that will be checked for movement,
- the position of this area (the top left corner of the area is at the point indicated),
- the name of the motion detector, and
- the tolerance
Motion detector program
The motion detector program runs when a motion is detected. It is written separately from the main program. Variables work globally across both programs. The input program runs in the block when motion detected.
Color detector
To use the camera as a color detector, you must drag the pipette symbol into the screened area in the camera configurator; then, a window will open at the right side where you can define, under inspector
- the pixel area that will be checked for colors,
- the position of this area (the top left corner of the area is at the point indicated),
- the name of the color detector, and
- the contrast
Call
You can use get color as [] to obtain the detected colors in a hexadecimal or RGB format. You can set the format using the drop down menu (small triangle).
Query
To query whether the detector detects a color, use the is color detected block. This block can be used as a condition.
To query whether the counter has detected a certain color, use this
![]()
the drill hole. You can use the block to compare the detected color with the one that was entered. You can use the drop down menu (small triangle) to select whether the set color should be the same as or different from the filmed color. This block can be used as a condition. In the example, the motor is stopped when the color detected is red.

Color detector program
The color detector program runs when a color is detected. It is written separately from the main program. Variables work globally across both programs. The input program runs in the block if color detected.
Ball detector
To use the camera as a ball detector, you must drag the Ball symbol into the screened area in the camera configurator; then, a window will open at the right side where you can define, under inspector
- the pixel area that will be checked for balls,
- the position of this area (the top left corner of the area is at the point indicated),
- the name of the ball detector,
- the range in which the diameter of the balls is located,
- the range of the x axis,
- the color of the ball, and
- the color tolerance
Call
Use get [] ball to obtain the x position, y position, radius or diameter of the ball.
Query
To query whether the detector detects a ball, use the if ball detected block. This block can be used as a condition.
To query whether the detector detects a ball with a certain x position, y position, radius, or diameter, use this
![]()
the drill hole. You can use the block to compare the specifications for the detected ball with an entered value. You can use the drop down menu (small triangle) to select what should be compared, and with what comparative operator. This block can be used as a condition. In the example, the motor is stopped when the diameter of the detected ball is 5.

Ball detector program
The ball detector program runs when a color is detected. It is written separately from the main program. Variables work globally across both programs. The input program runs in the block if ball detected.
Line detector
To use the camera as a line detector, you must drag the symbol with the dots on a line into the screened area in the camera configurator; then, a window will open at the right side where you can define, under inspector
- the pixel area that will be checked for lines,
- the position of this area (the top left corner of the area is at the point indicated),
- the name of the line detector,
- the number of lines to be detected, and
- the range in which the width of the line(s) lies
Call
Use get [] the line [] to obtain the position or width of one of a maximum of five lines.
Use get color of the line [] as [] to obtain the color of a line output in hexadecimal or RGB format. You can set the format using the drop down menu (small triangle).
Query
To query whether the detector detects a line, use the if line detected block. This block can be used as a condition.
To query whether the detector detects a line with a certain position or width use this
![]()
the drill hole. You can use the block to compare the specifications for the detected line(s) with an entered value. You can use the drop down menu (small triangle) to select what should be compared, and with what comparative operator. This block can be used as a condition. In the example, the motor is stopped when the width of the detected line is less than 2.

To query whether the detector detects a line with a certain color, use this
![]()
the drill hole. You can use the block to compare the detected line color with the one that was entered. You can use the drop down menu (small triangle) to select whether the set color should be the same as or different from the filmed color. This block can be used as a condition.
Line detector program
The line detector program runs when one or more lines have been detected. It is written separately from the main program. Variables work globally across both programs. The input program runs in the block if line detected.
Microphone
The microphone integrated in the camera can be used as a volume detector.
The Start each time block
The Start each time block offers the option of running a program when a condition is fulfilled. Therefore, it works similar to a case distinction, but runs not only one time, but rather every time the condition is fulfilled during the entire course of the program. The Start each time block:

Is an abbreviation for the following construct:
You can insert all conditions from this category into the microphone category in the Start each time block.
Note: The program section in the Start each time block should be kept short, and should not contain any blocking calls or endless loops, so that this part of the program can be processed quickly.
Volume detector
Call
Microphone volume provides the volume in decibels.
Query
To query whether the volume detector detects a certain volume level, use this
![]()
the drill hole. You can use the block to compare the detected volume with the one that was entered. You can use the drop down Menu (small triangle) to select what comparative operator should be used for the comparison. This block can be used as a condition.
Processing
Logic
Conditional statements
Conditional instructions are essential for programming. They make it possible to formulate case differentiations, such as:
- If there is a path to the left, turn left.
- If the number of points = 100, press “Good job!”.
if blocks
The simplest condition is an if block:
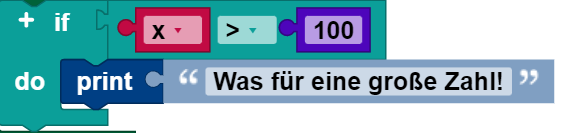
When it is executed, the value of the variable x is compared to 100. If it is larger, then “What a large number!” is output. Otherwise, nothing happens.
if else blocks
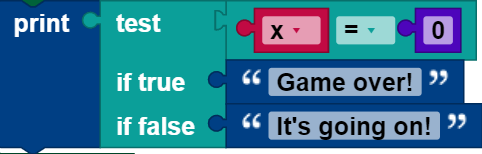
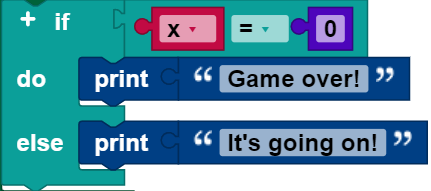
It is also possible to indicate that something should happen when the condition is false, as in this example:
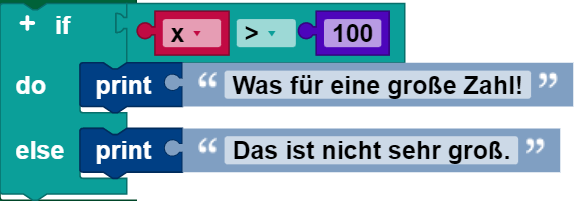
As in the previous block, “What a large number!” is output when x > 100. Otherwise “It's not very big’ is output.
An if block may have a do section, but not more than one.
if do else if blocks
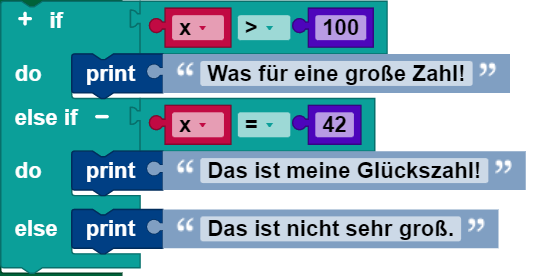
It is also possible to test multiple conditions with a single if block, by adding do else clauses:

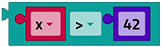
The block checks first whether x > 100, and outputs “What a large number!” if this is the case. If this is not the case, it then checks whether x = 42. If so, then it outputs “That is my lucky number!”. Otherwise, nothing happens.
An if block can have any number of if do sections. The conditions are evaluated from top to bottom, until one of them is fulfilled, or until there are no more conditions left.
if do else if do else blocks
if blocks can have both if do and else if sections:
The else if section guarantees that an action is executed, even if none of the previous conditions is true.
An else if section can also occur after any number of if do sections, including zero, which would then be a completely normal if do block.
Block modification
Only the simple if block and the if do block appear in the tool list:
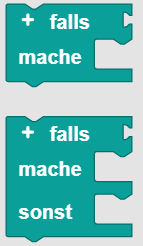
To add if do and else clauses, click the (+) symbol. The (-) symbol can be used to remove else if clauses:

Note that the shapes of the blocks permit any number of else if sub-blocks to be added, but only up to one if block.
Boolean logic
Boolean logic is a simple mathematical system with two values:
- true
- incorrect
Logic blocks in ROBO Pro Coding are generally there to control conditions and loops.
Here is an example:

If the value of x is not greater than 100, then the condition is false, and “It’s not very big.” is output. If the value of x is not greater than 100, then the condition is false and “It’s not very big.” is output. Boolean values can also be saved in variables and transmitted to functions, just like numbers, texts, and list values.
If a block expects a Boolean value as an input, then no input will be interpreted as false. Non-Boolean values cannot be inserted directly where Boolean values are expected, although it is possible (but not advisable) to save a non-Boolean value in a variable and then insert this into the condition input. This method is not recommended, and its behavior can change in future versions of ROBO Pro Coding.
Values
An individual block with a drop down list that either indicates true or false can be used to access a Boolean value:
Comparative operators
There are six comparative operators. Two inputs are entered into each (normally two numbers), and the comparative operator returns true or false, depending on how the inputs are compared to one another.


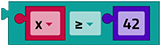
The six operators are: equal, not equal, less than, greater than, less than or equal, greater than or equal.
Logical operators
The and block returns true if and only if its two input values are true.

The or block returns true if at least one of its two input values is true.

do
The not block converts a Boolean input into its opposite. For example, the result of:
![]()
is false.
If there is no input, then the value true is assumed, so that the following block will generate the value false:
![]()
However, leaving an input empty is not recommended.
Three-part operator
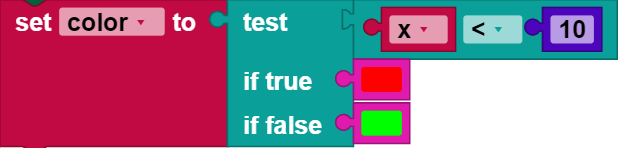
The three-part operator acts like a miniature if do block. It uses three input values The first Boolean condition to be tested is the first input value, the second input value is the value returned if the test is true, and the third input value is the value returned if the test is false. In the following example, the variable coloris set to red if the variable x is less than 10, otherwise the variable coloris set to green.
A three-part block can always be replaced by an if do block. The following two examples are just the same.
Loops
The “Controller” area contains blocks that control whether other blocks placed inside them are executed. There are two kinds of control blocks: if do blocks (which are described on a separate page) and blocks that control how often the action inside them is executed. The latter are called loops, since the action inside them, called the loop body or body may be repeated multiple times. Each run of a loop is called an iteration.
Blocks for creating loops
repeat continuously
The repeat continuously block executes the code in the body until the program ends.
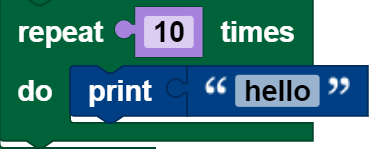
repeat
The repeat block executes the code in the body as many times ad indicated. The following block, for example, will output “Hello!” ten times:
repeat as long as
Imagine a game in which a player throws a dice and adds up all of the values shown, as long as the total is less than 30. The following blocks implement this game:
- A variable named total contains an initial value of 0.
- The loop starts with a check whether total is less than 30. If so, the blocks in the body are run.
- A random integer between 1 and 6 is generated (to simulate a dice value) and a variable named diced is saved.
- The thrown (“diced”) number is output.
- The variable total is increased by the number thrown, or diced.
- Once the end of the loop is reached, the controller goes back to step 2.
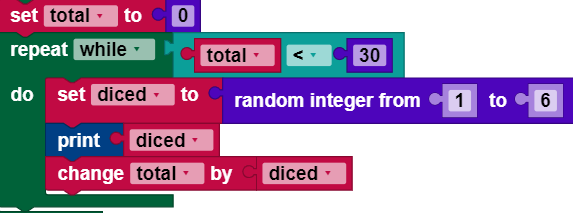
After the loop is ended, the controller runs through all of the following blocks (not shown). In the example, the loop ends after a certain number of random integers between 1 and 6 have been output, and the variable total then has the value of the total of these numbers, which is at least 30.
repeat until
repeat as long as loops repeat their body as long as a condition is fulfilled. Repeat until loops are similar, with the difference that they repeat the body until a certain condition is fulfilled. The following blocks are equivalent to the previous example, because the loop runs until total is greater than or equal to 30.

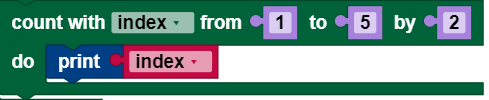
count from to
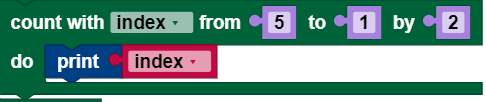
The count from to loop increases the value of a variable, starting with an initial value and ending with a second value, and in steps from a third value, whereby the body is executed once for each value of the variable. The following program, for example, outputs the numbers 1, 3, and 5.
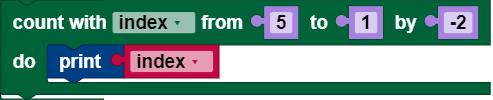
As the following two loops show, which each output the numbers 5, 3 and 1, this first value can be greater than the second. The behavior is the same, regardless of whether the incremental amount (third value) is positive or negative.
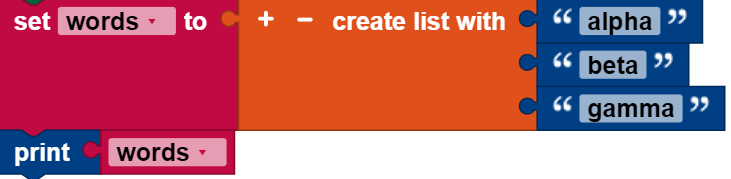
for each
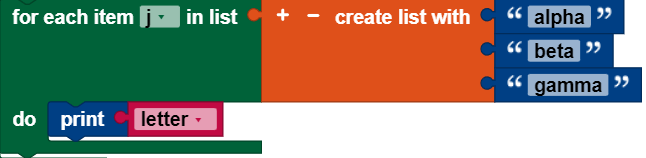
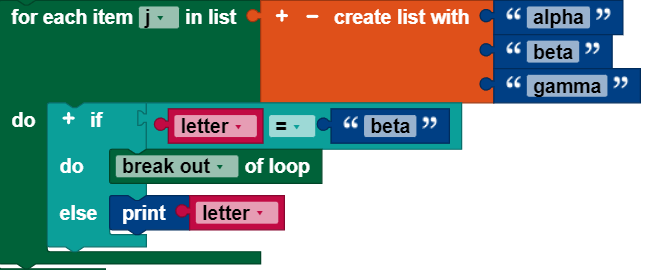
The for each block is similar to the count from to loop, but instead of the loop variables in a numerical sequence, it uses the values from a list in sequence. The following program outputs each element in the list “alpha,” “beta,” “gamma”:
Break out blocks
Most loops are run until the abort condition (for repeat blocks) is fulfilled, or until all values for the loop variable have been taken (for count with and for each loops). Two rarely needed, yet occasionally used blocks offer additional options for controlling loop behavior. They can be used with any kind of loop, even though the following example shows their use in the for each loop.
continue with next iteration
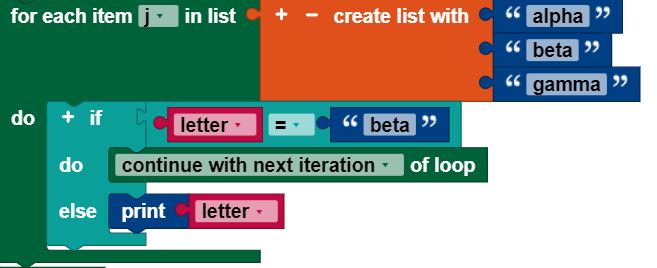
continue with next iteration causes the remaining blocks in the loop body to be skipped, and the next iteration of the loop to begin.
The following program outputs “alpha” during the first iteration of the loop. During the second iteration, the block continue with next iteration is executed, causing the output of “beta” to be skipped. In the last iteration, “gamma” is printed.
Break out
The break out block makes it possible to prematurely exit a loop. The following program outputs “alpha” for the first iteration, then breaks out of the loop during the second iteration when the loop variable equals “beta.” The third point in the list is never reached.
Mathematics
The blocks in the mathematics category are used to activate calculations. The results of the calculations can be used, for example, as values for variables. Most mathematic blocks relate to general mathematical calculations, and should be self-explanatory.
Blocks
Facts and Figures
Use the number block to enter any number into your program, or assign this number to a variable as a value. This program assigns the number 12 to the variable age :
![]()
Simple calculations
This block has the structure value - operator - value. The available operators are +, -, ÷, × and ^. The operator can be selected via the drop down menu. It can be applied directly to numbers, or to values of variables. Example:
![]()
This block outputs the result 144 (12^2).
Specialized calculations
This block applies the type of calculation selected from the drop down menu to the number behind it or the variable behind it. The available operations are:
- Square root,
- Sum,
- Natural logarithm,
- Decadic logarithm,
- Exponential functions with the base e (e^1, e^2,...),
- Exponential functions with the base 10 (10^1, 10^2,...),
- Changing sign (multiplying by -1.
e here is Euler’s number. This block takes the square root of 16 and sets the variable i to the result.
![]()
Trigonometric functions
This block works similarly to the block described above, with the difference that the trigonometric functions sine, cosine, tangent, and their inverse functions are used. The number indicated or the value of the variable indicated is therefore inserted into the function selected in the drop down menu, and the result can then be processed in the program. In addition, there is also the block arctan2 of X: ... Y: ..., which makes it possible to use two real numbers (to be entered as X and Y) to output a function value for the arctan2 in a range of 360°.
Frequently used constants
This block works similarly to the number block, however you do not enter the numerical value here yourself. Instead, frequently used constants (such as π) are saved here as defaults. The constants can be selected via the drop down menu.
Remainder of a division
The remainder of ... block is used to output the remainder of a division. This program assigns the variable remainder to the remainder of the devision of 3:2, or 1:
![]()
Round
The round ... block can be used to round an entered decimal number of the value of an entered variable to a whole number. You can choose from three options in the drop down menu:
- use “round” for standard rounding (e.g. 4.5 to 5)
- use “round up” for rounding up (e.g. 5.1 to 6)
- use “round down” for rounding down (e.g. 5.9 to 5).
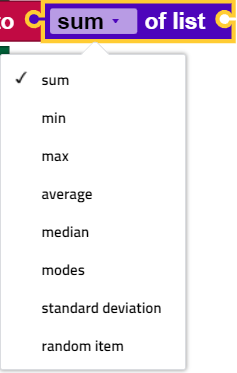
Evaluating lists
You can use the ... of the list block to output
- the sum of all values in a list with “sum,”
- the smallest value in a list with “min,”
- the largest value in a list with “max,”
- the average of all values in a list with “average,”
- the median of a list with “median,”
- the most frequent value in a list with “mode,”
- the standard deviation of all values in a list with “standard deviation,”
- a random value from a list with “random item”
. You can select all of these options using the drop down menu for the block:
Constrain input values
The constrain ... from ... to block allows you to constrain input values to a certain interval. Before an input value is processed, a test is conducted to check whether it is in the defined interval. There are three options for handling an entered value:
- The value is in the interval, so it is transmitted without change.
- The value is below the lower limit for the interval, so this lower limit is transmitted.
- The value is above the upper limit for the interval, so this upper limit is transmitted.
In this example, the block is used to constrain the value for the variable speed to the speeds supported by the motor:
![]()
Generate random values
The two blocks random number from ... to... and random break output a random value. The random number from ... to... block outputs a number from the defined interval. The block random break, in contrast, outputs a value between 0.0 (and may include this number) and 1.0 (may not include this number).
Text
Texts Examples of texts are:
“Thing 1”
“12. March 2010”
“” (empty text)
Text can contain letters (capital or lower case), numbers, punctuation marks, other symbols, and spaces.
Blocks
Creating text
The following block creates the text “Hello” and saves it in the variable named greeting:
![]()
The block create text with combines the value of the variable greeting and the new text “world” to create the text “Helloworld.” Please note that there is no space between the two texts, since there was none in the original texts.

To increase the number of text inputs, click the (+) symbol. To remove the last output, click the (-) symbol.
Changing text
The block to ... append adds the entered text to the given variable. In this example, it changes the value for the variable greeting from “Hello” to “Hello, there!”:
![]()
Text length
The length of block counts the number of characters (letters, numbers, etc.) contained in a text. The length of “We are #1!” is 12, and the length of the empty text is 0.
![]()
![]()
Check for empty text
This is empty block checks whether the entered text is empty (the length is 0). The result is true in the first example, and false in the second example.
![]()
![]()
Search for text
These blocks can be used to check whether a text is present in another text, and if so, where. For example, this block checks for the first occurrence of “e” in “Hello,” and the result is 2:
![]()
This one checks for the last occurrence of “e” in Hello, which is also 2:
![]()
Regardless of whether the first or last occurrence is selected, this block delivers the result 0, since “Hello” does not contain a “z.”
![]()
Extracting text
Extracting a single character
This returns “b,” the second letter in “abcde”:
![]()
This returns “d,” the next to last letter in “abcde”:
![]()
This returns “a,” the first letter in “abcde”:
![]()
This returns “e,” the last letter in “abcde”:
![]()
This contains each of the 5 letters in “abcde” with the same probability:
![]()
None of them changes the text from which these results are extracted.
Extracting a text range
The in text ... get substring from block can be used to extract a text range that either starts with:
- letter #
- letter # from end
- first letter
and ends with:
- letter #
- letter # from end
- last letter
In the following example, “abc” is extracted:
![]()
Change text capitalization
This block generates a version of the input text either written in
- UPPER CASE (all letters in caps) or
- lower case (all letters as lower case), or
- Substantive (first letters capitalized, other letters lower case).
The result of the following block is “HELLO”:
![]()
Non-alphabetic characters are not affected. Please note that this block does not work on text in languages without capital and lower case letters, like Chinese.
Trimming (removing) spaces
The following block removes spaces, depending on the settings in the drop down menu (small triangle):
- at the start of the text
- at the end of the text
- on both sides of the text
The result of the following block is “Hi you.”
![]()
Spaces in the middle of the text are not affected.
Print text
The print block causes the input value in the console window to be printed:
![]()
It is never sent to the printer, although the name might seem to indicate this.
Output text with formatting
You can use the formatted text block to output texts with formatted variable content. All place holders {} in the text are replaced with the content of the variables appended after the text. Formatting can be entered into the brackets. The formatting {:.1f}, for instance, outputs only the first decimal place in the variable t.

Data structures
Lists
Creating a list
create list with
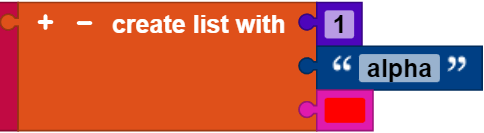
You can use the create list with block to enter the initial values in a new list. In this example, a list of words is created and saved in a variable named letters:

We designate this list as [“alpha,” “beta,” “gamma”].
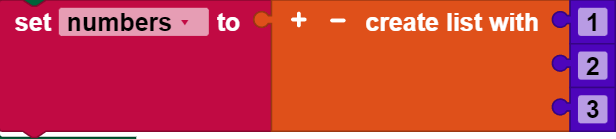
This shows the block for creating a list of numbers:
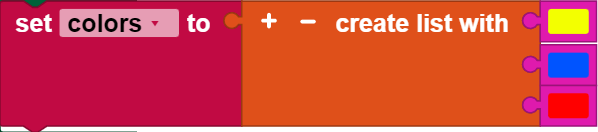
Here is how to create a list of colors:
It is less common, but possible to create a list of values of different types:
Change number of inputs
To change the number of inputs, click or touch the gear symbol. This will open a new window. You can drag element sub-blocks from the left side of the window to the list block on the right side to add a new input:
While the new element in this example is inserted at the bottom, it can be added anywhere. Similarly, element sub-blocks that are not desired can be dragged to the left and out of the list block.
Create list with item
You can use the create list with item block to create a list containing the indicated number of copies of an item. The following blocks, for example, set the variable words on the list [“very,” “very,” “very”].
![]()
Check the length of a list
is empty
The value of an is empty block is true if its input is the empty list, and false if it is anything else. Is this input true? The value of the following block would be false, because the variable color is not empty: It has three items.
![]()
Note how similar this is to the is empty block for text.
Length of
The value of the length of block is the number of elements that are in the list used as the input. The value of the following block would be 3, for instance, since color has three elements:
![]()
The value of the length of block is the number of items in the list used as the input. The value of the following block would be 3, for example, although words consists of three copies of the same text:
![]()
Note how similar this is to the block length of for the text.
Searching for items in a list
These blocks find the position of an item in a list. The following example has a value of 1, because the first occurrence of “very” is at the start of the list of words ([“very,” “very,” “very”]).
![]()
The result of the following is 3, because the last occurrence of “very” in the words is at position 3.
![]()
If the item is not in the list at all, then the result is a value of 0, as in this example:
![]()
These blocks behave the same way as the blocks for finding letters in text.
Getting items from a list
Getting a single element
Remember the definition of the list colors:

The following block contains the color blue, because it is the second item in the list (starting from the left):
![]()
This one contains green, because it is the second element (starting from the right end):
![]()
This contains the first item, red:
![]()
This contains the last item, yellow:
![]()
This one chooses a random item from the list, with the same probability of returning one of the items red, blue, green or yellow.
![]()
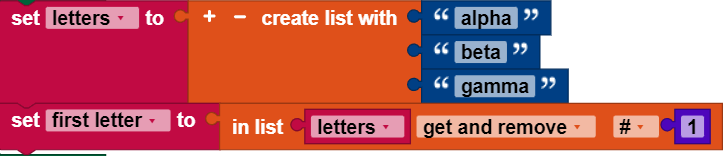
Get and remove an item
You can use the drop down menu to change the block in list ... get to the block in list ... get and remove, which delivers the same output, but also changes the list:
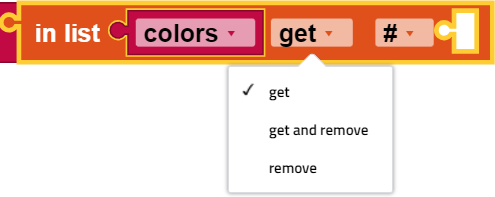
this example sets the variable first letter to “alpha” and leaves the remaining letters ([“beta,” “gamma”]) in the list.
Removing an entry
If you select remove from the drop down menu, the tab at the left of the block will be removed:
![]()
Then, the first item from letter will be removed.
Get a sub-list
The block in list ... get sub-list is similar to the block in list ... get, with the difference that it extracts a sub-list and not an individual item. There are multiple options to enter the start and end of the sub-list:
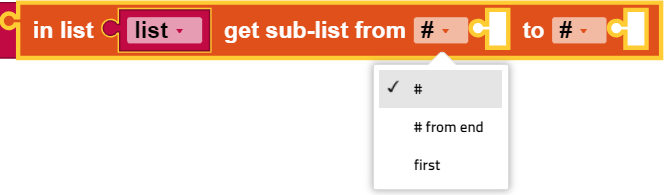
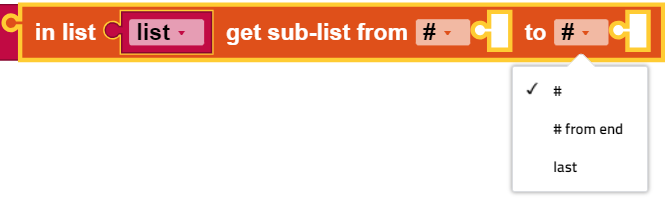
In this example, a new list first letters is created. The new list has two items: ["alpha,” "beta"].

Please note that this block does not change the original list.
Adding items to a list
Replacing items in a list
The block in list ... set replaces the item at a certain point in a list with another item.
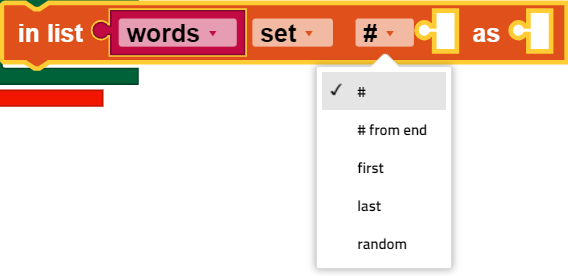
The meanings of the individual drop down options are outlined in the previous section.
The following example does two things:
- The list words is created with 3 items: [“very,” “very,” “very”].
- The third item in the list is replaced with “good.” The new value of words is [“very,” “very,” “good”]

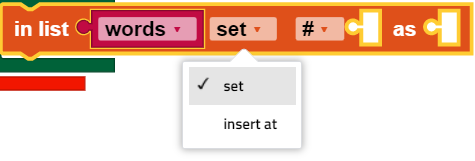
Insert items from a certain point into a list
The in list ... insert at block is accessed via the drop down menu for the in list ... set block:
It inserts a new item at the indicated point into the list, before the element that was previously located there. The following example (which builds on an earlier example) does three things:
- The list words is created with 3 items: [“very,” “very,” “very”].
- The third item in the list is replaced with “good.” The new value of words is therefore [“very,” “very,” “good”].
- The word “Be” is inserted at the start of the list. The final value of words is therefore [“Be,” “very,” “very,” “good”].

Divide character strings and merge lists
Make list from text
The block make list from text uses a delimiter to divide the given text into parts:
![]()
In the example above, a new list will be returned containing three segments of text: "311,” "555" and "2368".
Make text from list
This block make text from list assembles a list into a single text using a delimiter:

Related blocks
Printing a list
The print block in the text category can output lists. The result of the following program is the console output shown:
Complete something for each element in a list
The for each block in the controller category executes an operation for each element in a list. This block, for example, prints each item in the list individually:

The items in this case are not removed from the original list.
See also the examples for break out blocks.
Map
JSON
Util
The usage category contains blocks of the following type in ROBO Pro Coding:
- Color selection
- Wait
- Python Code
- Start
- Function execution
Color selection
This block serves as an input value if a color is queries (for instance if the camera is completing a color comparison). You can click or touch the color to choose one of a range of 70 colors.
Wait
Wait until the time has expired
The block wait [] ... prevents the program from continuing to run for the indicated wait time. You can select the time unit in the drop down menu (small triangle) as well as the desired pause length in the input field beside it.
Wait with condition
In the wait until block, the pause is linked not to the time but to the fulfillment of a condition (such as whether a button is pressed). The condition is added to the wait until block.
Python Code
If you would like to integrate existing Python Code into ROBO Pro Coding, you can insert it into the Python Code block. The program will then execute everything written in the block in Python.
Start
The start when block is also linked to a condition. The program in the block body will only start once this condition is fulfilled.
Function execution
You can use the execute function ... in a thread to execute the selected function in a separate thread. In some cases, this measure can allow the program to continue reacting to inputs and to be executed more quickly.
Variables
We use the term variable as it is used in mathematics and other programming languages: a named value that can be changed (varied). Variables can be created in different ways.
- Some blocks like count with and for each use a variable and define its values. A traditional IT term for such variables is loop variables.
- User-defined functions (also called “procedures” can define inputs, which can be used to create variables that can only be used in this function. Such variables are traditionally referred to as “parameters” or “arguments.”
- Users can change variables at any time using the set block. These are traditionally called “global variables.” They can be used anywhere in the code of ROBO Pro Coding.
Drop down menu
When you click the drop down symbol (small triangle) for a variable, the following menu appears:

The menu offers the following options.
- display the names of all available variables defined in the program.
- “rename variable ...,” e.g. change the name of this variable wherever it appears in the program (choosing this option will open a query asking for the new name)
- “delete variable ...,” e.g. Delete all blocks that refer to this variable, wherever they are in the program.
Blocks
Set
The set block assigns a value to a variable, and creates the variable if it does not yet exist. For example, this is how to set the value for the variable age to 12:
![]()
Call
The call block delivers a variable saved in a variable without changing it:
![]()
It is possible to write a program containing a call block without a relevant set block, but this is a bad idea.
Change
The change block inserts a number for a variable.
![]()
The change block is an abbreviation for the following construct:

Example
Look at the following example code:

The first row of blocks creates a variable named age and sets its initial value to the number 12. The second row of blocks calls up the value 12, adds 1 to it, and saves the total (13) in the variables. In the last line, the following message appears: “Congratulations! You are now 13.”
Functions
Functions are used to make parts of the code reusable and thereby provide an overarching structure for the code. If you complete a function block, a new block will appear in the Functions menu with the same name as this function block. Now, it is possible to simply insert the block with the name of the function in the main program. When the program is run, this block will lead to the code in the function of the same name, and process this code.
Simple function
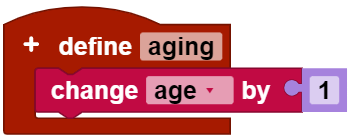
The simple function block can be used to create a function bearing the name entered in the text field. This function can contain as many variables as desired, which are added using the gear symbol. This function aging adds 1 to the variable age:
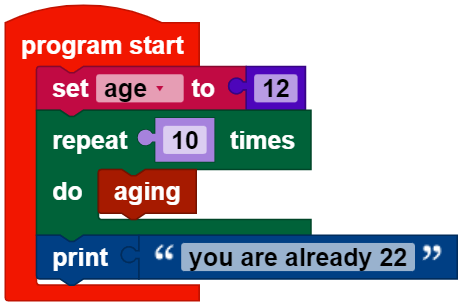
The function can then be used in the main program:
Function with return value
This block makes it possible to create a function with return value. The return value can then be used in the main program. Here is an example:

Machine Learning
The group "Machine Learning" contains blocks for using with TensorFlow project and the USB camera.
Creates an image analysis for a model in the path on the TXT 4.0 controller.

Creates an object recognition with a standard model "sorting route with AI".

Creates an object identifier for a model in the path on the TXT 4.0 controller.

Analyses an image with object or image recognition. The recognised properties, their probability and, in the case of object recognition, their position are output. The result of this block can be written into a variable in order to evaluate it later in the "get value of result item [item]" block. block.

Outputs a single value of a property of the xth result of an image or object analysis. The item can either be the "process image" block directly or its results from a variable.

Imports
Imports contains all functions from self-defined modules in "lib".
Functions are used to make parts of the code reusable and thus to structure the code as a whole.
see "Functions"
Communication
Voice Control
Blocks for communication with the Voice Control app.
on command received: text
Executed when a new text has been received from Voice Control app.
text
Text is the recognised voice command.
Cloud / MQTT
fischertechnik Cloud
Blocks for communication with the fischertechnik Cloud.
These blocks are used for "Sensorstation IoT" and "Training Factory Industry 4.0".
MQTT Client
MQTT stands for "Message Queuing Telemetry Transport" protocol and is often used in IoT (Internet of Things) applications.
MQTT client create: websockets

Creates an MQTT client with which messages can be received and sent. It is recommended to write the output of the block into a variable in order to be able to use the client several times later in other blocks.
MQTT client ... connect

Connects an MQTT client to an MQTT broker with the specified settings. Client can be the block "MQTT client create" or its output in a variable. Host specifies the address of the MQTT broker. To use the local MQTT broker, localhost or 127.0.0.1 is entered as the value. To use external MQTT brokers, their IP address or host name must be used. Port specifies the port on which the MQTT Broker is available. The default is 1883 for MQTT Broker (fischertechnik Cloud) or 2883 (GUI application). If external MQTT brokers are used, their port must be entered. Username and password are empty by default; for external servers, their login information must be entered here.
MQTT client ... is connected

MQTT client can be the block "MQTT client create" or its output in a variable. Returns "true" if the specified MQTT client is connected to an MQTT broker. If the MQTT client is not connected, "false" is returned.
MQTT client ... disconnect

MQTT client can be the block "MQTT client create" or its output in a variable. Disconnects the specified MQTT client from the MQTT broker.
MQTT client ... publish

MQTT client can be the block "MQTT client create" or its output in a variable. Publishes a message "payload" with the specified MQTT client in a specified channel "topic". In addition, "qos" and "retain" can be specified, i.e. whether newly connected clients should receive the message after sending and with which security level the message should be sent.
MQTT client ... publish (with return value)

MQTT client can be the block "MQTT client create" or its output in a variable. Publishes a message "payload" with the specified MQTT client in a specified channel "topic". In addition, "qos" and "retain" can be specified, i.e. whether newly connected clients should receive the message after sending and with which security level the message should be sent. If the message is sent successfully, "true" is returned, otherwise "false".
MQTT client ... will set

MQTT client can be the block "MQTT client create" or its output in a variable. Sets the message "payload", which is to be sent after disconnecting the MQTT client in a specified channel "topic", and with which security level the message is to be sent.
MQTT client ... subscribe

Subscribes to a channel with an MQTT client. The function to be executed when receiving a message is specified in the callback argument. "Qos" specifies the security level with which the message is to be sent.
subscribe callback ... : message

Defines a function that is to be executed by receiving a message. Message contains the received message.