
TXT 4.0 Controller
The TXT 4.0 Controller is the new heart of all ROBOTICS models. It controls the actuators, and analyzes information from the sensors.
To do so, the TXT 4.0 Controller has a wide range of ports where you can connect components. The operating manuals for the ROBOTICS models and fischertechnik.de provide more information about which components can be connected to which ports, and what the functions of the ports are.
You can use the color touch display to conveniently operate the TXT 4.0 Controller.
You define how the controller handles the individual components, and what they should do, by the program you write in the ROBO Pro Coding software.
Switching the Controller on and off
To switch the Controller on, press and hold the On/Off button. Complete the same action to turn the Controller back off. When it is switched on, the LED in the On/Off button will first be illuminated blue, then red, then blue again, and then green during start-up. Once the Controller is ready to function, the LED will be illuminated blue once again.
Connecting the Controller
To program the Controller, you will need a connection to a computer, tablet, or smartphone on which the ROBO Pro Coding development environment can run. The Controller and device can be connected via WiFi or Bluetooth, or via USB if necessary.
Connecting via WiFi
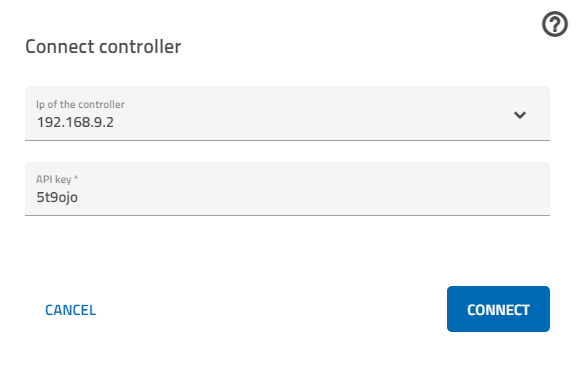
- In ROBO Pro Coding, click the router symbol at the top right to open a window (see below)
- Select “WIFI AP” for the top line
- Connect the Controller to your WiFi
- Search for the IP of the Controller under Info -> WiFi, and enter it into the top line of the input window on your device
- In the line under “API key,” enter the “API key (on the Controller under Settings -> API key)
- If you click connect, the window will close and the router symbol will turn green. It is possible that the window will close, but the router symbol is yellow. In this case, you have either entered something incorrectly, or the process is still loading.
Connecting via Bluetooth
- Connect your device to the Controller via Bluetooth (in the Bluetooth menu for the computer, tablet, or smartphone)
- Select “Bluetooth” for the top line; the IP that appears there does not have to be changed
- In the line under “API key,” enter the “API key (on the Controller under Settings -> API key)
- If you click connect, the window will close and the router symbol will turn green. It is possible that the window will close, but the router symbol is yellow. In this case, you have either entered something incorrectly, or the process is still loading.
Connecting via USB
- Connect the Controller to your device using the USB cable
- Select “USB” for the top line; the IP that appears there does not have to be changed
- In the line under “API key,” enter the “API key (on the Controller under Settings -> API key)
- If you click connect, the window will close and the router symbol will turn green. It is possible that the window will close, but the router symbol is yellow. In this case, you have either entered something incorrectly, or the process is still loading.